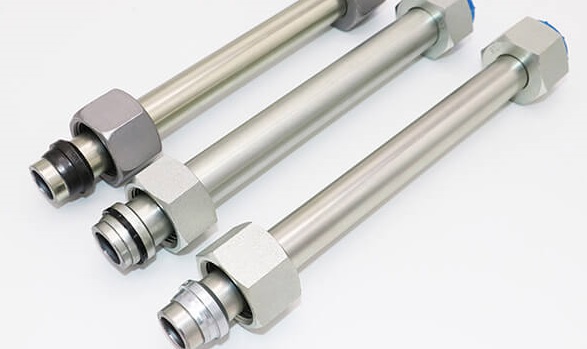







back to : fittings for connecting precision tubes
Assembly of cutting rings on the tube
Cutting ring assembly instructions
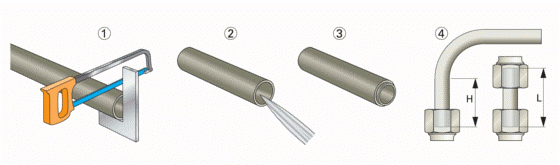
1. Cut the tube at a right angle. A deviation from the right angle of 0.5º is permissible.
2. Remove internal and external burrs ( you can use a deburring tool )
3. For thin-walled tubes as well as those made of aluminum or copper, reinforcement sleeves must be used.
4. Minimum lengths of the straight section of the tube must be maintained according to the table below.
|
Series |
LL |
L |
S |
|||||||||||||||||||||
|
tube outer diameter |
4 |
5 |
6 |
8 |
6 |
8 |
10 |
12 |
15 |
18 |
22 |
28 |
35 |
42 |
6 |
8 |
10 |
12 |
14 |
16 |
20 |
25 |
30 |
38 |
|
H min. |
24 |
25 |
25 |
26 |
31 |
31 |
33 |
33 |
36 |
38 |
42 |
42 |
48 |
48 |
35 |
35 |
37 |
37 |
43 |
43 |
50 |
54 |
58 |
65 |
|
L min. |
30 |
32 |
32 |
33 |
39 |
39 |
42 |
42 |
45 |
48 |
53 |
53 |
60 |
60 |
44 |
44 |
47 |
47 |
54 |
54 |
63 |
68 |
73 |
82 |
LUBRICATION
All our fittings are coated with a colorless lubricant. Additional lubrication of fittings with diameters smaller than 20 mm is not necessary. In case of disassembly and reassembly, the fittings should be oiled.
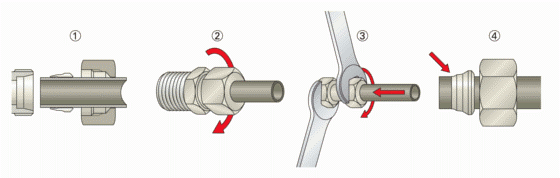
ASSEMBLY USING WRENCHES (for single and double-edge rings)
Slide ring and nut onto the tube according to the diagram below.
2. Tighten the nut by hand until resistance is felt.
3. While pressing the tube against the stop in the fitting, tighten the nut with a wrench by approximately 1.1/4 to 1.1/2 turns.
4. Cutting check: Unscrew the nut and check if a collar covering the front part of the cutting edge has appeared. Rotation of the ring is permissible, however, the ring must not move along the tube.
Reassembly: if the ring bite is correct, tighten the nut with the same force as during assembly. To achieve this, tighten the nut by hand until resistance is felt, then using a wrench, tighten by approximately 1/4 turn.
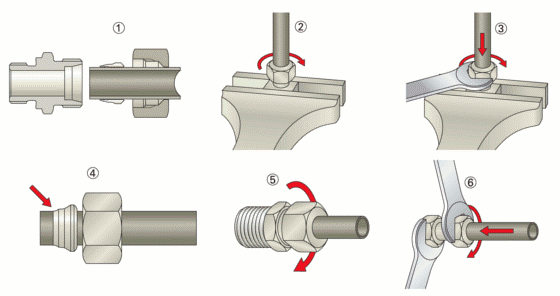
ASSEMBLY IN A VISE USING A PRE-ASSEMBLY DIE
Lubricate the thread and the working part of the assembly die
1. Slide the ring and nut onto the tube according to the diagram below.
2. Tighten the nut by hand until resistance is felt.
3. While pressing the tube against the stop in the die, tighten the nut with a wrench by approximately 1.1/4 turns.
4. Pre-cutting check: Unscrew the nut and check if a collar covering the front part of the cutting edge has appeared. Rotation of the ring is permissible, however, the ring must not move along the tube.
Final assembly using the fitting body:
5. Tighten the nut by hand until resistance is felt.
6. Tighten the nut by approximately 1/4 turn.
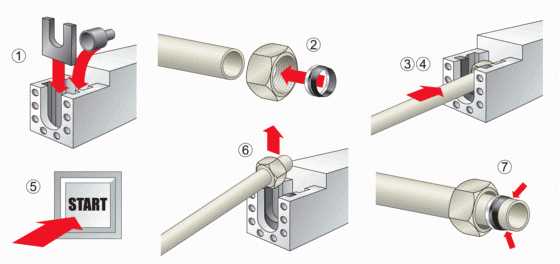
ASSEMBLY USING RING PRE-CUTTING DEVICE
1. Select the appropriate die and back-up plate, corresponding to the tube diameter and fitting series.
2. Slide the ring and nut onto the tube according to the diagram below.
3. Place the tube with the ring and nut in the device between the die and the back-up plate.
4. Press the tube against the die stop.
5. Hold the tube steady in a position perpendicular to the device. Press and hold the START button until the pre-assembly process is automatically completed.
6. After the process is complete, remove the tube from the device.
7. Check if a collar covering the front part of the cutting edge has appeared. Rotation of the ring is permissible, however, the ring must not move along the tube.
Final assembly: Tighten the nut by hand until resistance is felt, then with a wrench by approximately 1/4 turn.
SYSTEM DESCRIPTION
Cutting ring fittings provide easy and fast assembly of pipelines, guaranteeing a high level of installation safety.
The fitting consists of a body, a cutting ring, and a special nut. Depending on the pressure, three series of components are available: the LL series for the lowest pressures, the L series for medium pressures, and the S series for the highest pressures.
CUTTING RINGS
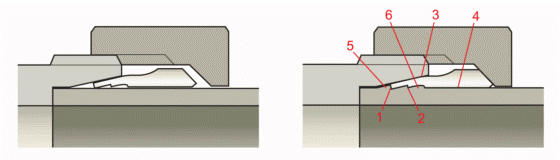
Double-edge ring ( for L and S series) – is a standard ring offering very good connection tightness and compatibility with fittings according to the DIN 2353 standard. During assembly, two cutting edges (1 and 2), due to their geometry, while moving along the cone (3), bite into the tube surface creating a visible metal collar (5) covering the front cutting edge. Edge (1) bites into the tube earlier than edge (2), and after the bite, the surface (6) blocks further interference of the edge into the tube. The contact surface (4) provides additional support for the tube.
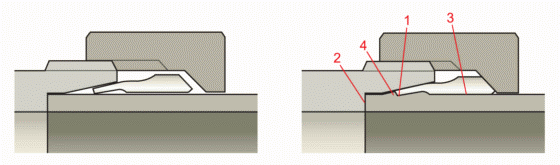
Single-edge ring (for LL series) – is a ring designed for low-pressure installations (maximum 100 bar). During assembly, the cutting edge (1), moving along the cone, bites into the tube surface creating a visible metal collar (4) covering the front part of the edge. The tube must be pushed against the connector stop (2).
Example of an assembled ring on a hydraulic tube